XImage与Pixmap的差别
XImage与Pixmap都是Xlib的数据结构,并且都和图片有关,我们首先分析一下他们之间的区别。
XImage的数据结构在xlib.h中定义
/*
 * Data structure for "image" data, used by image manipulation routines.
 */
typedef struct _XImage {
    int width, height;      /* size of image */
    int xoffset;        /* number of pixels offset in X direction */
    int format;         /* XYBitmap, XYPixmap, ZPixmap */
    char *data;         /* pointer to image data */
    int byte_order;     /* data byte order, LSBFirst, MSBFirst */
    int bitmap_unit;        /* quant. of scanline 8, 16, 32 */
    int bitmap_bit_order;   /* LSBFirst, MSBFirst */
    int bitmap_pad;     /* 8, 16, 32 either XY or ZPixmap */
    int depth;          /* depth of image */
    int bytes_per_line;     /* accelarator to next line */
    int bits_per_pixel;     /* bits per pixel (ZPixmap) */
    unsigned long red_mask; /* bits in z arrangement */
    unsigned long green_mask;
    unsigned long blue_mask;
    XPointer obdata;        /* hook for the object routines to hang on */
    struct funcs {      /* image manipulation routines */
    struct _XImage *(*create_image)(
        struct _XDisplay* /* display */,
        Visual*     /* visual */,
        unsigned int    /* depth */,
        int     /* format */,
        int     /* offset */,
        char*       /* data */,
        unsigned int    /* width */,
        unsigned int    /* height */,
        int     /* bitmap_pad */,
        int     /* bytes_per_line */);
    int (*destroy_image)        (struct _XImage *);
    unsigned long (*get_pixel)  (struct _XImage *, int, int);
    int (*put_pixel)            (struct _XImage *, int, int, unsigned long);
    struct _XImage *(*sub_image)(struct _XImage *, int, int, unsigned int, unsigned int);
    int (*add_pixel)            (struct _XImage *, long);
    } f;
} XImage;Pixmap的数据结构在X.h中定义
typedef XID Pixmap;从定义我们就能得知,Pixmap是一个简单的句柄。而XImage是一个完整的数据结构。Pixmap是存储在Server端,我们通过句柄操作。而XImage是存储在客户端,我们可以随意操作。
Pixmap操作函数
从手册了解,操作Pixmap有如下方法
- XCreatePixmap
- XFreePixmap
- XCopyArea
- XCopyPlane
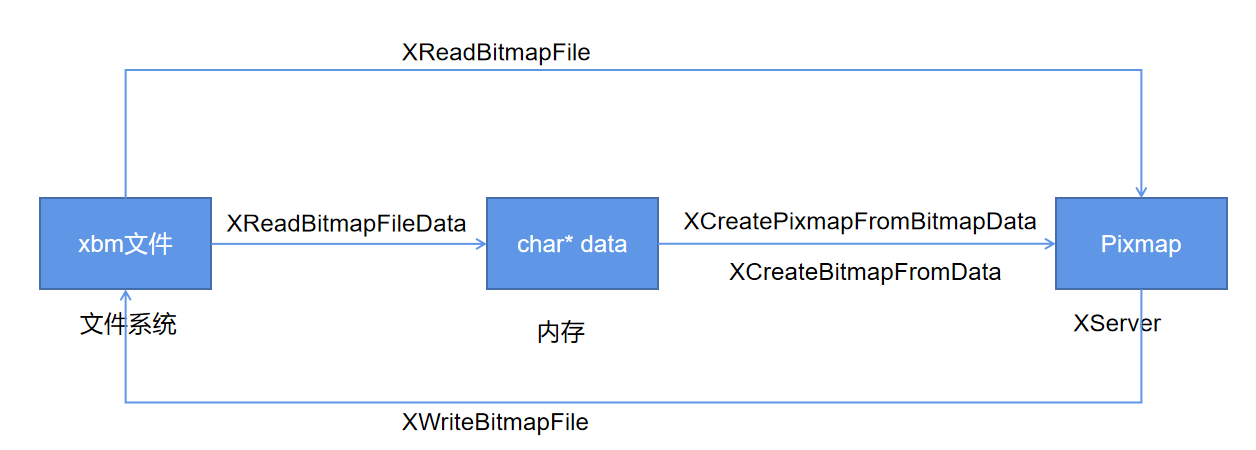
- XReadBitmapFile 从文件中读取数据,保存在pixmap中
- XWriteBitmapFile 把一个pixmap写入到文件中
- XReadBitmapFileData 从文件中读取数据,返回一个char*的data
- XCreatePixmapFromBitmapData 从data数据生成一个pixmap
- XCreateBitmapFromData 从data数据创建一个pixmap
我画了一张简单的图来解释

XImage操作函数
从 手册了解,操作XImage数据结构有如下方法
- XCreateImage
- XDestroyImage
- XInitImage
- XPutImage
- XGetImage
- XGetSubImage
- XSubImage
- XAddPixel
- XGetPixel
- XPutPixel
Example
#include <stdio.h>
#include <stdlib.h>
#include <X11/Xlib.h>
#include <X11/cursorfont.h>
#include <math.h>

#define STB_IMAGE_IMPLEMENTATION
#include "stb_image.h"

void test_or_die(int rc)
{
    // #define Success           0    /* everything's okay */
    // #define BadRequest       1    /* bad request code */
    // #define BadValue       2    /* int parameter out of range */
    // #define BadWindow       3    /* parameter not a Window */
    // #define BadPixmap       4    /* parameter not a Pixmap */
    // #define BadAtom           5    /* parameter not an Atom */
    // #define BadCursor       6    /* parameter not a Cursor */
    // #define BadFont           7    /* parameter not a Font */
    // #define BadMatch       8    /* parameter mismatch */
    // #define BadDrawable       9    /* parameter not a Pixmap or Window */
    // #define BadAccess      10    /* depending on context:
    //             - key/button already grabbed
    //             - attempt to free an illegal
    //               cmap entry
    //            - attempt to store into a read-only
    //               color map entry.
    //            - attempt to modify the access control
    //               list from other than the local host.
    //            */
    // #define BadAlloc      11    /* insufficient resources */
    // #define BadColor      12    /* no such colormap */
    // #define BadGC          13    /* parameter not a GC */
    // #define BadIDChoice      14    /* choice not in range or already used */
    // #define BadName          15    /* font or color name doesn't exist */
    // #define BadLength      16    /* Request length incorrect */
    // #define BadImplementation 17    /* server is defective */

    // #define FirstExtensionError    128
    // #define LastExtensionError    255
    switch (rc)
    {
    case Success:
        printf("rc=%d Success\n", rc);
        return;
    case BadRequest:
        printf("rc=%d BadRequest\n", rc);
        break;
    case BadValue:
        printf("rc=%d BadValue\n", rc);
        break;
    default:
        printf("rc=%d Unknown error\n", rc);
        break;
    }
    exit(1);
}

void setimage(Display *X, Window win, GC gc)
{
    XImage *ximage;
    int depth = DefaultDepth(X, 0);
    int width, height, n;
    int rc;
    unsigned char *idata;
    unsigned char *buffer;

    idata = stbi_load("wld.jpg", &width, &height, &n, 0);
    buffer = malloc(width * height * 4);

    for (int i = 0; i < width * height; i++)
    {
        buffer[i * 4] = idata[i * 3 + 2];
        buffer[i * 4 + 1] = idata[i * 3 + 1];
        buffer[i * 4 + 2] = idata[i * 3];
        buffer[i * 4 + 3] = 0;
    }
    stbi_image_free(idata);

    ximage = XCreateImage(X, DefaultVisual(X, 0), depth, ZPixmap,
                          0, (char *)buffer, width, height, 32, 0);
    rc = XPutImage(X, win, gc, ximage, 0, 0, 0, 0, width, height);
    test_or_die(rc);

    free(buffer);
}

int main()
{
    Display *X;
    Window win;
    GC gc;
    XSetWindowAttributes attributes;
    XKeyEvent event;

    X = XOpenDisplay(NULL);

    attributes.background_pixel = 0x4433ff;
    attributes.border_pixel = 0x3344ff;

    win = XCreateWindow(X,
                        XRootWindow(X, 0),
                        0, 0, 556, 720,
                        15,
                        DefaultDepth(X, 0),
                        InputOutput,
                        DefaultVisual(X, 0),
                        CWBackPixel | CWBorderPixel,
                        &attributes);

    XDefineCursor(X, win, XCreateFontCursor(X, XC_right_side));

    XSelectInput(X, win, KeyPressMask | ExposureMask);

    gc = XCreateGC(X, win, 0, NULL);

    XMapWindow(X, win);
    while (1)
    {
        XNextEvent(X, (XEvent *)&event);
        switch (event.type)
        {
        case Expose:
            setimage(X, win, gc);
            break;
        case KeyPress:
        {
            XFreeGC(X, gc);
            XCloseDisplay(X);
            exit(0);
        }
        break;

        default:
        {
            printf("%p\n", &event);
        }
        break;
        }
    }
    return 0;
}
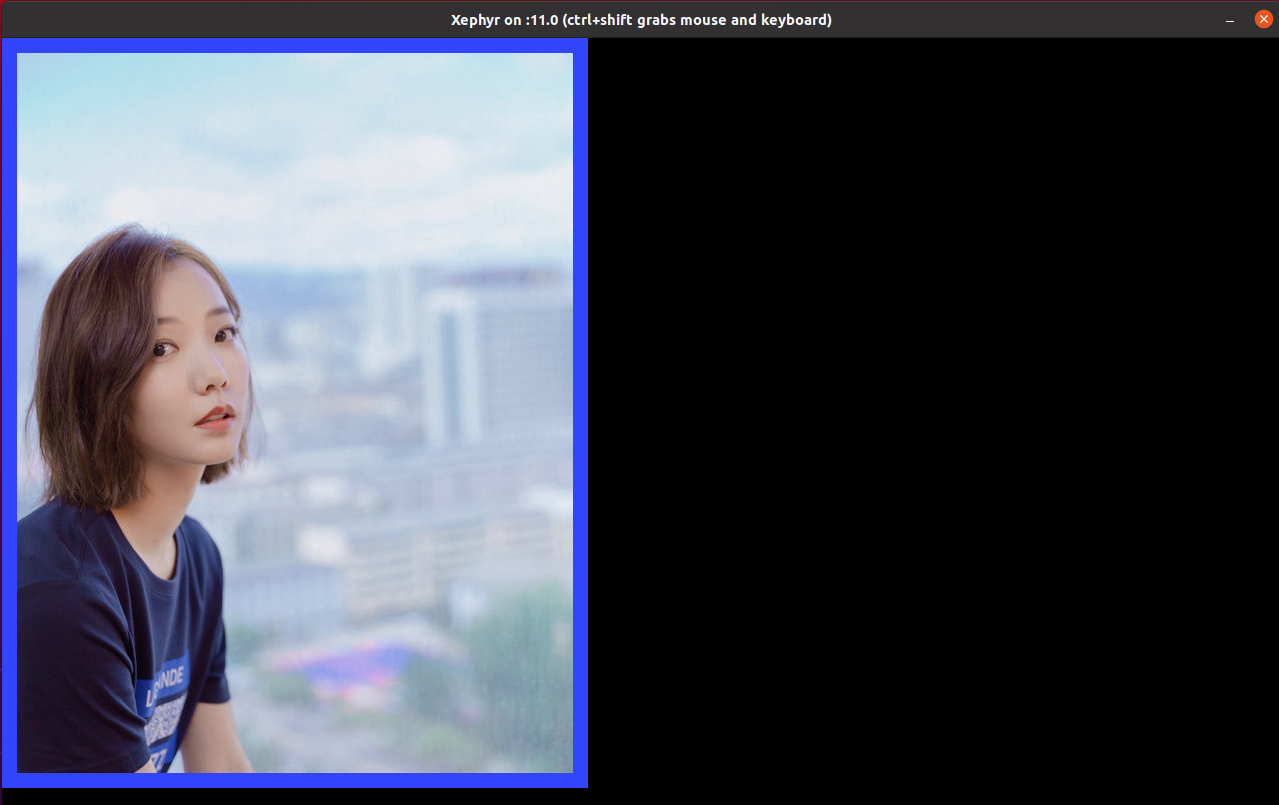
我们看到图片显示正确!

这里需要注意一个点:颜色!
颜色
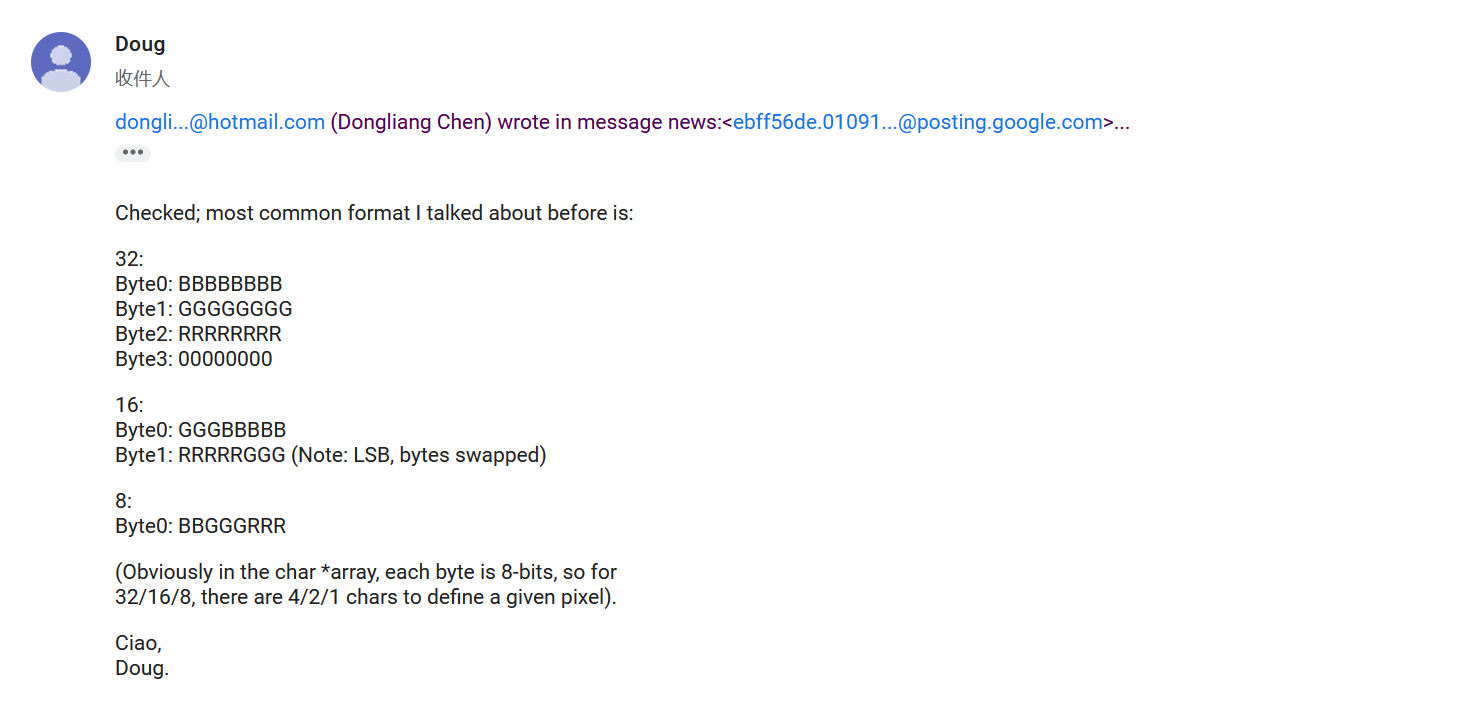
stbi_load加载图片数据到内存中,内存布局是 R G B, 每一个是一个unsigned char。
XCreateImage函数接收的内存数据是

所以,我们需要做一个转换。